
All I want to do everyday is crafts, decorate, and cook. I dream of having my own craft room with wood floors, big tables, and floor to ceiling cabinets where I can have everything. Maybe someday...but for now I have our kitchen table and a few random places where I can put everything. The leaves on the mountain are starting to change and the mornings and nights are becoming crisp...that's how you know fall is fast-approaching. So this weekend, I decided to make something that would start to bring the fall season into our home. I call it the book page pumpkin. It was easy to make, but took me all afternoon. Sorry homework, you got put on the back burner this weekend.
First, you fold a piece of paper in half and draw the shape of the pumpkin you want. Cut it out and you have your template.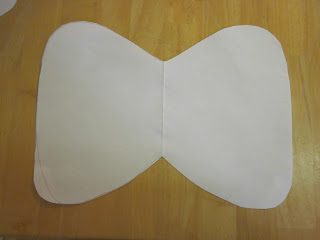 Lay the template on the book and trace it on the pages.
 Then, start cutting out the pages. You can do like 10 or so pages at a time. Repeat that for the whole book.
 When that is done, you will have to cut off the binding and any other excess pieces.
 Next, glue the binding together so it forms a circle.
 Then, you have to glue each page to each other, so that it will stand and spread apart. I just put some hot glue in the crease of every page and glued the pages to each other. It is kind of confusing, sorry!
 Now, it will stand up and you can fluff it into the shape and form you want it to be in.
 I got some orange spray paint, went outside, and just lightly sprayed the edges.
 I found a stick in the yard to use for the stem. Just hot glue it in the binding.
 Lastly, to add some color, I tied some green ribbon on for a bow. And there you have your finished book page pumpkin. So fun!!!
 Side note: Make sure you have good scissors or else they will end up like this:
 Best part of this whole thing...it was all under $12.
Next week's project- fall wreath to hang on our door! Can't wait!!!
First, you fold a piece of paper in half and draw the shape of the pumpkin you want. Cut it out and you have your template.
 Lay the template on the book and trace it on the pages.
 Then, start cutting out the pages. You can do like 10 or so pages at a time. Repeat that for the whole book.
 When that is done, you will have to cut off the binding and any other excess pieces.
 Next, glue the binding together so it forms a circle.
 Then, you have to glue each page to each other, so that it will stand and spread apart. I just put some hot glue in the crease of every page and glued the pages to each other. It is kind of confusing, sorry!
 Now, it will stand up and you can fluff it into the shape and form you want it to be in.
 I got some orange spray paint, went outside, and just lightly sprayed the edges.
 I found a stick in the yard to use for the stem. Just hot glue it in the binding.
 Lastly, to add some color, I tied some green ribbon on for a bow. And there you have your finished book page pumpkin. So fun!!!
 Side note: Make sure you have good scissors or else they will end up like this:
 Best part of this whole thing...it was all under $12.
Next week's project- fall wreath to hang on our door! Can't wait!!!
No comments:
Post a Comment